She has a 'thing' for cards as do I. And because of this she is very often posting cards and ideas. Most recently this included one of her sketches and a challenge to follow her lead. So that is just what I did. Here is her card and sketch:
She also included step by step instructions to her card if you wanted to play along. She made it so easy. And since I needed a few cards, as well as some fresh inspiration, I followed along, as much as I could. Because my way started taking over, and so my take is, for obvious reasons, a bit different.
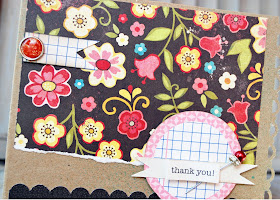
Like her, this card is kraft based. There is a border punch on the front. Mist was used to add depth. Her suggestion was to use patterned paper or a stamp on the main body. I chose patterned paper with an added element. For the sentiment on the circle tag, courtesy of Avital, I used a thank you sentiment and made a little banner from it. The bottom patterned paper is a scallop border. And I too added a pin to the tag as an added embellishment. Am sure I will use Avital's printables again, especially if Alexandra posts a challenge using the same.
To help with some cohesiveness, I used a blending tool and ink to ease the white of the circle tag. The edges were also distressed some. The little flag in the top left corner is cut out from another of the circle tags, and also distressed with the ink and blending tool. A decorative brad was added to anchor that to it's home.
I am a fan of the banner look right now. So, the circle tag was a perfect home for that sentiment, and will be on it's way soon to thank a friend for a recent dinner in her home.
Thank you for stopping by. I am off on a road trip. So if I do not stop by and visit you soon, that will be the reason.
ink: Tim Holtz Walnut Distress Ink
paper: Gertie by Stella and Rose
tools: Scallop border punch by Stampin Up; Lace border punch by Fiskars; Tattered Angels mist; Tim Holtz blending tool
other: Jenni Bowlin stick pin; decorative brad from Stella and Rose


thanks for sharing that link, and what a delightful Card too!
ReplyDeleteOh your card is cute!! lovely take on that sketch from Alexandra.
ReplyDeleteWAOUHHH Jamie!
ReplyDeleteWhat a beautiful card and lovely post ;-)
I love reading about your own creative process...
Thank you so much for your kind words, You SHINE!!
Have a wonderful trip!
xox
Oh wow, this is beautiful!
ReplyDeleteHey Jamie, what a lovely card!
ReplyDeleteGorgeous! Thanks for the comment on my blog Jamie, your blog is gorgeous and I'll be a regular visitor for sure!
ReplyDeleteHow sweet your card is, Jamie! Love it! I'm a real fan of the banner look, too, so I adore your sentiment. The pin is beautiful. Love the kraft base and the pretty paper and the scalloped edging. :)
ReplyDeleteThanks for the kind comments on my blog, I was looking for an email address to reply to your comment, but couldn't find it. Yes, be warned, once you start re-decorating or fixing up, it's hard to stop!
ReplyDelete